Showing posts with label baking (sort of). Show all posts

Monday, August 13, 2012

Coconut-Chocolate Haystacks

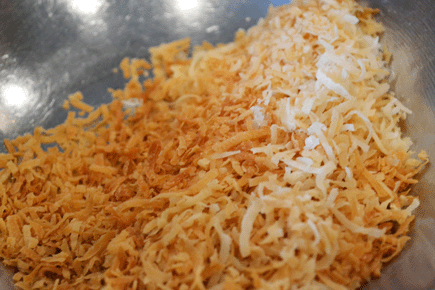
It's been so hot this summer. And as if that isn't bad enough, we're out of chocolate-chip cookies. Oh, the horror! I started browsing Martha Stewart's website for no-bake recipes and found these. Strictly speaking, they aren't no-bake, since you have to toast the coconut, but I got around that by using the toaster oven. You can also use a skillet; just watch the coconut very closely.


Chocolate-Coconut Haystacks (from marthastewart.com):
Makes 18-20, depending on how much of the coconut you eat

Ingredients:

1-1/2 cups sweetened shredded coconut
3-3/4 ounces (106.310712 grams) semi-sweet chocolate
5 drops almond or vanilla extract


Instructions:

Preheat oven to 350 degrees. If using small baking pan, use convection oven. (The coconut won't be in a single layer, so it would take longer to toast in a normal oven.)
Place coconut onto baking sheet in a single layer (unless using small pan) and put into oven.

Toast for about 10 minutes until golden, stirring occasionally.

Allow to cool completely.

Meanwhile, melt chocolate in double boiler or microwave. Allow to cool for 5 minutes.

Combine chocolate, coconut, and almond extract in medium bowl; stir until well-combined.

Place mixture by tablespoons onto parchment-covered baking sheet.

Refrigerate for 20 minutes.

Store in fridge.


These are absolutely delicious. Crisp and crunchy, the coconut isn't overwhelmed by the chocolate. It still shines out. They'll keep for quite a while in the fridge, but I never found out exactly how long they'll stay fresh. They got eaten too fast. No one seemed to miss the almond extract that the original recipe called for. (We didn't have it, so I used vanilla instead.) Though the original recipe claimed to make 20, I wound up with 18 because... Well, you know how much I like cookie batter. The same principle applied here.
Oh well.



Thursday, July 12, 2012

Chicken Marbella

I was at my grandparent's house last week and my aunt and I were trying to think of something to cook for my cousin's birthday. She pulled out her go-to dish, chicken marbella. Having never heard of it, I was slightly terrified when I looked at the recipe, which includes prunes, olives and capers. At least it doesn't have anchovies, I thought.
I was also unable to pronounce it correctly. (It's pronounced mar-bay-ya, not mar-bell-a, as I thought it was.) Though I was skeptical, everyone assured me that it was amazing and we had to make it.
So I did.

Chicken Marbella (Adapted from The Silver Palate Cookbook):
Serves 10-12


Ingredients:


12 boneless, skinless chicken breasts
1 medium head of garlic or 2 small heads, pureed
1/3 cup dried oregano
coarse salt and freshly ground pepper to taste
1/2 cup plus 1/3 cup red wine vinegar
1 cup olive oil, divided
1-1/2 cup pitted prunes
2/3 cup pitted Spanish green olives, drained
1 3.5 oz jar capers with juice
6-8 bay leaves
1-1/2 cup brown sugar
1 cup white wine
1/4 cup Italian parsley or fresh cilantro, finely chopped


Instructions:


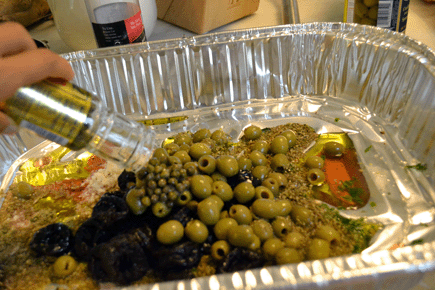
In large bowl or roasting pan, combine garlic, oregano, pepper and coarse salt to taste, 1/2 cup vinegar, 1/2 cup olive oil, prunes, olives, capers with juice, and bay leaves.
Mix until combined. Add chicken breasts and coat with marinade.

Cover and let marinate in fridge for at least 6 hours; preferably overnight. Turn chicken over and re-coat halfway through marinating.
Coolest. Fridge. EVER.

Preheat oven to 350 degrees. Arrange chicken in a single layer in one or two large baking pans. Sprinkle with brown sugar and pour white wine around chicken.

Bake for at least 20 minutes, until inside of chicken is cooked. Baste every 15 minutes.

(We had oven problems, so I don't have an exact figure on the baking time. Ours took an hour, but the breasts were still partially frozen and the oven was being opened every few minutes. My aunt said that it should have taken around 20 minutes.)
With a slotted spoon, transfer chicken, prunes, olives, and capers to serving platter. Pour several spoonfuls of marinade on top and pour remaining pan juices into a sauceboat. Sprinkle chicken generously with parsley or cilantro. Serve.

To serve cold, allow to cool to room temperature in roasting pan, then transfer to a serving platter and serve.


Well, my relatives were right. This was great! The chicken was moist and perfectly cooked, despite our oven "issues", and tasted great. It had a slightly sweet outer crust with a nice tang from the vinegar. The prunes were really good after soaking in the pan juices, although I've never liked olives before and I still didn't like them then. It was really easy to prepare the marinade. My only issue is that we had so much trouble cooking it, which was really my fault. I recommend serving this with rice or really good bread, as we did.
Question of the Day: Who the heck thought of marinating chicken with prunes, olives, and capers? And why?

Thursday, June 21, 2012

Chocolate Caramel Mug Cake

Here's a revelation I had a couple of days ago: It's possible to have chocolate cake in less than 5 minutes.
You probably are thinking, "No way! That's not possible!"
Well, it is. You use the microwave.
Now you're thinking, "Blasphemy! No cake can be made in the microwave and still taste good!"
Well, it can be. You mix batter for an individual cake and pour it in a mug and and bake it in the microwave. And it's good.
"..."
Exactly.

Here's how, using NomNomBlingBling's recipe found through the Huffington Post:

Chocolate Caramel Mug Cake

Ingredients:

4 tablespoons all-purpose flour
4 tablespoons sugar
3 tablespoons unsweetened cocoa powder
1/4 teaspoon baking powder
1/4 teaspoon salt
The bananas lurking in the background are not part of the recipe.
1 beaten egg
3 tablespoons skim milk
1 tablespoon vegetable oil
2 salted caramels (If you don't have salted caramels, press a few grains of sea salt into the tops of normal caramels. BOOM! Instant fancy salted caramels.)
1/8 cup chocolate chips (The original recipe doesn't call for this. Look below to see why I added it.)


Preparation:

Mix flour, sugar, cocoa, baking powder, salt, egg, milk, and oil in a bowl.
Me being a rebel and mixing it in the mug
Pour into a coffee mug and drop caramels in center one at a time.
"Noo!!" *glub glub glub*
Microwave on high for one minute and 15 seconds. It will rise above the mug edge and appear to be boiling over, but don't panic–it's not. By the time the batter gets to the top of the mug, it will have turned into cake.
It took a lot of willpower to leave it in when it rose.
If it's not cooked through, microwave for 7-15 seconds more.


Despite being made in a microwave, this cake was great! It was moist and tasty, although I feel that there could have been a more intense chocolate flavor. That's why I added the 1/8 cup of chocolate chips to the recipe. The texture is a little different than a conventional chocolate cake–it's slightly rubbery. Also, the caramels sank to the very bottom and melted, so most of it was just chocolate cake. It may have been because I took a bunch of pictures before putting it in the microwave, giving them time to sink all the way to the bottom. Along with the caramel at the bottom, there was a big flour pocket because I was too lazy to mix it in a bowl like the recipe said and just mixed it in the mug. Bad idea.

The bottom quarter of the cake had streaks of flour and the side of the mug had batter on it from the whisk.
Anyway, this cake is perfect if you get struck by a sudden chocolate craving and don't want to turn the oven on–or just can't wait long enough for a cake to bake. (It was above 90 degrees outside the day I made this. It's not fun to have a 350 degree oven spewing heat inside an already hot house. Thus, the mug cake.)